Feeds:
Posts
Comments

Posts Tagged ‘dessert’

It is amazing how productive I can be during finals. I mean, I am on a roll. In the past 48 hours alone, I have: mailed in my parking tickets, secured a part time job for the summer, written that last blog post, written this blog post, and made THESE:
Chocolate Mascarpone Brownies

Chocolate Mascarpone Brownies. I had half a tub of mascarpone leftover from my tart and I didn’t know what to do with it. So while I was procrastinating, I happened to see this which led me to this recipe. I just happened to have the exact amount of mascarpone, as well as a whole bag of Ghiradelli semi-sweet chocolate chips and Ghiradelli cocoa powder. “PERFECT!” I said to myself as I put aside my english paper again.
Chocolate Mascarpone Brownies

I would like to note that I adore my paper topic. However, I love it so much that I don’t want to ruin it by writing about it. Especially when writing about it involves 15 pages! I have never written something so long (maybe a lab report). Especially not about LITERATURE. I will pause right now to reccomend that anyone who hasn’t read Zora Neale Hurston’s Their Eyes Were Watching God should go read it immediately. I am rarely effected by a novel. Especially not a book that one would read as “classic literature” <insert haughty accent>. However I was floored by this book. It is vivid and vibrant and so beautiful. Anyone out there who is as addicted to food blogs as much as I am is surely a visual person, and Hurston’s language is as visual as you can get. As I read more and more criticism, I continue to be more and more impressed. For anyone who cares (probably no one, but that’s ok), I am writing about Janie’s ability to visualize herself and her self empowerment, as relating to the power of the visual and the female body.

But back to procrastination…These brownies were superb. They hardly belong in the “brownie” category. More like “fudgy bite of heaven” category. And, you know what? They were not hard to make. This was my first experience with ganache. SO simple and SO delicious. I think next time I would like to use a darker chocolate.

Some more “visual power” for you:
Chocolate Mascarpone Brownies

Read Full Post »

Last week I spent one whole day eating. Then skipped lunch the next days so I could eat more. Especially more of THIS:

Strawberry Mascarpone Tart

Let me just talk briefly about thursday, though. First of all, I was very tired, having stayed up until 2 am finishing a presentation. I woke up a little later than I wanted to, so my breakfast was a little late. Then I went to class. Then I was supossed to meet a friend for lunch. Then I went to my afternoon class where we had a long day of presentations. Our prof. brought us snacks as a treat. From there I went to the Relay for Life VIP reception, which was catered, where I ate a whole bunch of snacks and watched everyone sample the beer. So I ate more snacks and complained about how my 21st birthday was in one week. From there I went to dinner with my english class at a prof’s house, where I continued to eat and watch everyone drink wine and complain about how my 21st birthday was in one week. From there I went to our Relay for Life wrap up committee meeting where we got ice cream and sundae stuff to treat the committee. And I ate half a pint of ice cream. What a day! Delicious, but fattening.

But I knew there was more to come, for Friday was the Equestrian Team End of the Year dinner & trail ride. As usual, I was assigned the task of dessert.
Strawberry Mascarpone Tart

I was fretting because I wasn’t sure if people wanted chocolatey or fruity or cakey or creamy. I had originally considered doing this lemon-strawberry tart thing, but I was concerned about my ability to make lemon curd. I had never done it before and I was pressed for time, because I had to finish my research paper before I could go bake. And then there was my iGoogle home page.

This little beauty showed up on my Simply Recipes gadget in my time of need. It was my first time ever making a tart, and it went really well! The tart itself was refreshing and the team polished off the entire thing. The balsamic was subtle and tangy. It was a really interesting addition. My glaze had gotten a little sticky because I let it cool a little too long and it was difficult to glaze with, so I actually would have liked MORE balsamic on my tart, but it was still good.

Next time I make this tart: I will cut my strawberries in halves to make decorating a little easier. I will let my strawberries drain a little more. My only option for draining was a colander and I didn’t get as much of the juice out as I would have liked. They were a little too wet so the top of the tart got a little juicy when I cut it… Now for the recipe:

Strawberry Mascarpone Tart with Balsamic Glaze

Prep time: About 2 hours, including refrigeration of the dough

  • Crust (used Easy Tart Crust recipe from Epicurious)
  • 2 lbs strawberries
  • 1/2 cup granulated sugar
  • 1 Tbsp orange zest, divided
  • 1 teaspoon lemon juice
  • 12 ounces mascarpone cheese
  • 1/2 teaspoon vanilla
  • 1/3 cup confectioner’s sugar
  • 1 Tbsp balsamic vinegar

1. Bake crust, following directions, weighting it down with pie weights (I used parchment paper with uncooked rice). Let cool.

2. Whilst the crust bakes: Combine your strawberries with half of orange zest and granulated sugar so the strawberries are coated with sugar. Let sit for 30 min to macerate.

3. Mix together the mascarpone cheese, confectioner’s sugar, the remaining orange zest, lemon juice and the vanilla until well combined. Refrigerate until needed.

4. After the strawberries have macerated for 30 minutes, place a sieve over a bowl and drain the liquid out of the strawberry mixture into the bowl. Take that strawberry liquid and put it in a small saucepan. Add a tablespoon of balsamic vinegar to the saucepan, and bring to a boil on medium high heat. Boil until the liquid has reduced to the consistency of syrup, remove from heat and let cool. I let mine cool too long and it became kind of goopy…Maybe I boiled it too long too?

5. Assemble the tart. Spread the mascarpone mixture over the bottom of the tart shell. Arrange the strawberries on top of the mascarpone mixture. Use a pastry brush to brush on the balsamic glaze.

Read Full Post »

Since my camera is broken, I checked my iPhoto for any outstanding pictures, and I found these apple pie pictures from early fall, post-Happy Valley. As many people know, I LOVE pie. But you know what I’m not a big fan of? The gooey-ness in fruitpies. I don’t mind it in strawberry rhubarb, but I have a bit problem with cherry pie because of the goo-factor. You know that cornstarch-y goo that messes up those delicious cherries? Bleh!

As such, when it comes to my apple pies, ain’t no cornstarch goin’ near my apples! Luckily, most “Vermont Apple Pie” recipes are in agreement. The first requirement are apples fresh from a Vermont orchard. The apples are then peeled and thinly sliced then tossed with a number of yummy ingredients – sugar, cinnamon, nutmeg, butter, flour, etc.

I used the Basic Flaky Pie Crust recipe off of epicurious.

Apples covered in deliciousness peek through the latticetop.

Apples covered in deliciousness peek through the latticetop.

I left my little recipe book up at school, unfortunately, so I don’t have the recipe I used. Most “Vermont Apple Pie” recipes suffice, however. Some have an egg, some have more flour or more butter than others. I like the ones that include a bit of cider vinegar or fresh cider, since we always have those in supply up here. They’re all quite good. All they need is a melted slice of cabot and they are truly vermont pies, then

Apple Pie Time

There’s no goop in THIS pie! Only juicy deliciousness. You can see that space in the pie is taken up by layers of apples and the juice leeched from them during baking. Mmm…

Apple Pie Time

A true Vermont college student enjoys their pie from a Frisbee with Vermont Woodchuck Draft Cider.

Read Full Post »

call me sugarface

One day I went out to lunch with my lab. It was then that I learned of Kristin’s love of waitresses using petnames. Such as “What can I getcha, hon?” Or “No problem, sugar”, “Kay, sweetie”. I suppose it’s reminiscent of diners and places where you order a cuppa coffee an a peesa pie. I agree that it’s cute, but I’m not one to refer to others by nicknames usually. Even my boyfriend is simply “Stuart”. Not “Stu”, not “Stuie” (which my friends-who-don’t-know-him call him), not “pumpkin”, or “honey”, or “baby”. Pretty much the same goes the other way.

So you can imagine my surprise when I got a text one day from him and it simply said: call me sugarface. Of course I did wonder whether he was calling ME sugarface and wanted me to call him. But considering the lack of comma it actually seemed to request that I call HIM sugarface. Teehee.

This is TOTALLY relevant because today I made a Honey Castella, a dense delicious honey cake. I snatched the recipe from No Special Effects’ blog here.

Honey Cake 2

It was pretty easy to make – a different sort of endeavor for me. The batter was so airy and light. However, I found the actual cake itself to be a little…um…chewy. I think it’s my fault. I’m not a good enough trouble shooter to know why it might end up slightly dense (in a not good way). I wonder – should I have let it bake longer? Did I let it get too warm in the initial egg-mixing stage? At my school we have this term called January Term. One month, one class. An awesome J-term class would be The Chemistry of Baking. I would really love to know more about why I mix things slow, then fast, and hot, and cold. That’s what I get for being a biochem major, though. Wanting to know these things.

I used an 8 1/2 in. round pan which I know was a little big. In fact, the cake pulled away from the sides. It is a very simple dessert, which I appreciate a lot. However, with a little extra honey (cause we can all use some extra honey) drizzled on top and a scoop of vanilla ice cream, I completely ignored my botched texture because it was soooo yummy.

Honey Cake 1

Recipe: Honey Castella, as written on No Special Effects

* 88g (1/2 cup + 2 tablespoons) all-purpose flour

* 3 large eggs, at room temperature

* 1 large egg yolk, at room temperature

* pinch of salt

* 126g (1/2 cup + 2 tablespoons) granulated sugar

* 42g (1 tablespoon + 2 teaspoons) honey

* 22g (1 tablespoon + 2 teaspoons) canola or other neutral oil (you may also use the same weight, or 1-1/2 tablespoons of butter, melted)

Preheat the oven to 175°C (350°F). Spray an 8-inch round pan with baking spray and line the bottom and sides with parchment. Don’t spray the parchment after lining. Sift the flour onto a sheet of wax paper or a bowl and set aside. In a heatproof (or mixer) bowl, add the eggs, egg yolk, salt, sugar, and honey. Place this over a saucepan of simmering water and beat on medium speed with a hand mixer (or use a whisk) for 10 minutes (the mixture will be at least 40°C, or 104°F). Take off the heat and beat on high speed for at least 6 more minutes using a hand mixer (or 10 minutes on a stand mixer if you started out with a whisk). The batter will be cool, pale and form very thick ribbons that take a very long time to sink completely into the surface of the batter.

Gently fold in the flour into the batter in 3 additions. Take about 1/2 cup of the batter and whisk it into the oil until completely homogeneous, then drizzle it back into the batter, folding continuously as you add it.

Pour the batter into the prepared pan and bake for 20 minutes, then turn the heat down to 150°C (300°F) and continue baking for 18-25 more minutes, or until a toothpick inserted into the center comes out with a few very fine crumbs. Cool the cake completely (cool inverted on a sheet of greased parchment if desired). Unmold to a serving platter.

Read Full Post »

In the past week and a half I’ve had finals, my birthday, and three days worth of travel, but I am finally home. And boy is it BORING. My family moved to Jacksonville, FL after I went to school and I haven’t been here for any longer than a two week period. This means I never have any way of finding people to know let alone time to get to know them. Basically, I watch a lot of TV. A LOT of Top Chef. And I spend a lot of time at Blockbuster renting series. I rented Showtime’s series The Tudors about King Henry VIII. HBO’s Rome (which I watched at the end of last summer over a 5 day period) was a better period piece, but I love historical fiction about the early Tudor period, so it’s enjoyable all the same.

Unlike other bloggers, I have no Amazing Cooking Mother. My dad does all the cooking. I realize now, however, that I think I ate the same 5-10 meals throughout my childhood. And I love them. They involve salmon patties, homemade macaroni and cheese, tuna melts, burgers, some dish involving noodles from a package and a protein, in my high school years we got really creative with store bought pizza crusts (ie. take whatever is in the fridge/left over and put it on the pizza with some cheese). My dad and I are totally happy living off of sandwiches. All that is relevant to now is that when I went to bake this morning we had no vanilla! I feel like vanilla extract is one of those things you just keep accumulating and you have 3-4 half bottles of vanilla in the cupboard. I actually had to go to a NEIGHBOR and borrow some.

What did I make? Well, I made the elusive clafoutis. I don’t believe I’ve ever heard this word pronounced aloud before. I did my research and found “kla-foo-tee” to be correct pronunciation (can someone confirm this?). I haven’t actually eaten clafoutis before, but all the pictures looked good and what combination of flour, sugar, eggs, butter, milk, and fruit could really be bad?

I made Blackberry and Mango Clafoutis.

After taking this picture I ate about half this piece then remembered the recipe’s suggestion to sprinkle some pistacio on top, so I added some and it was definitely a good choice. It added a great texture.

Anyway, even though we were out of vanilla it was great to be home where we at least have REAL MIXING BOWLS. And knives that work. And a dad to send to the store to buy blackberries.

I spent some time today learning how to control the white balance on my little Nikon Coolpix. I also spent some time learning how to cut mangoes. My boyfriend is the ultimate mango slicer so he usually does it when we’re at school. On my own, however, with much riper mangoes than I’m used to, it proved a little difficult. You know what? I took a picture of my mango dissection failure…I’m not even going to put it up. It’s too embarrassing.

place fruit on your buttered dish

See, my kitchen here is unfortunately very dark. In fact, this whole house has serious natural light issues. It’s a rental house. Because of this, I was very tempted to use my flash. Especially after I found a white balance for flash setting. But the blackberries, dark as they were, seemed to throw this off. Not to mention the counter top is a dark granite. It was very frustrating. Then, I still have not gotten Adobe Photoshop Elements for my Mac. I used to have it on my old PC. I was SO photoshop savvy way back when in my super duper scrapbooking days.

I so love the contrast in this fruit. Although I complicated my photography, I found the clafoutis quite simple to make! Whisk some stuff together and pour it over fruit.

For some reason I was having some focusing problems with my camera which was a little weird. My favorite thing about this dish? The way the blackberries floated to the surface of the batter, and appear as these little purple clusters of dots just below the surface. My daddy messed up my picture of my whole clafoutis because he picked a couple of those very same blackberries off of the top! I guess I can’t blame him.

I borrowed the recipe from Mandy’s blog: Fresh from the Oven.

So how was my very first taste of clafoutis? Great! Actually, no, it was better once I put the pistachios on. I think it’s a little too eggy of a dish for me. But that MIGHT be because I had a fried egg for breakfast, and quiche for lunch, and then a second slice of this! Oops. In fact I still haven’t had dinner.

On that note, I think I’ll make myself a sandwich and get back to watching my current tv show obsession: The Wire. This is because, unfortunately, the second season of The Tudors is airing now and I don’t get showtime. Also, I’m not willing to hunt it down online because one of the best parts of the show is ogling the detail put into costuming and set. (But for a fabulous endorsement of why you should watch The Wire, skip on over to one of my professors’ blog, Just TV, and poke around.)

Read Full Post »

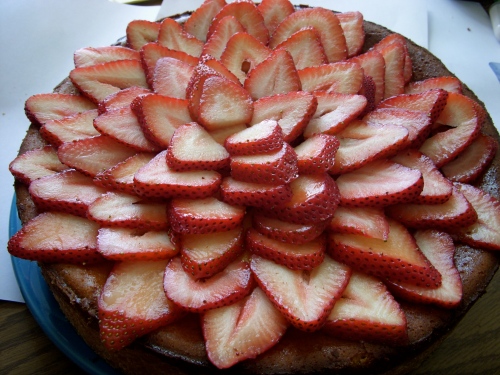
Speaking of cheese, I made this lovely ricotta cheesecake this past weekend for our Equestrian Team end of the year dinner.

It was an epic baking experience. Since I have no kitchen, I asked Caitlin if I could borrow hers. Caitlin was my CRA (Commons Residential Adviser) last year and now she works in the admissions office. At Middlebury, CRA’s are recently graduated students who live in an apartment in a freshman dorm and give advice and let people use their kitchens or tv’s. In terms of the commons “family”, your CRA is your really cool aunt. We got really attached to Caitlin and we still go to her house every Thursday night to watch Lost.

In the process...

Filling, naked fruit, and zest.

The only problem is that Caitlin seriously lacks MIXING BOWLS. This is an issue. You see that bowl in the picture above? That was still missing many ingredients. I blended for as long as I could with my electric mixer, then had to switch to very, VERY carefully stirring. Not only was it a small bowl, but the sides of it were SLANTED. Well, I prevailed…

Oh, it's a CAKE

One more thing I lacked was a rolling pin. So I just kind of pressed the dough down into the pan. This led to a thick corner edge of the crust and a kind of thin center. Many difficulties ensued when trying to remove it from the bottom of Katie’s ancient tart pan (which she found at a rummage sale or something).

Who needs a kitchen when you have a dorm room?

...if only I had a kitchen...

So I finally left Caitlin’s and left the cake in my boyfriend’s little fridge. The next morning I went ahead to add my strawberries. Who needs counter tops when you have a desk and a chair, though? That’s part of my very brightly colored room. I sat where the orange plate was and sliced strawberries on top of it on my lap. Cutting boards? Nah. College live is all about improvising, right?

That's one of the nicely colored dining hall plates it's on.

Strawberry slicing took a little bit of learning. First I sliced some too thick and some too thin. Then I finally figured out a good slice size and ate all of my mistakes. Ehe. To me, the cake looks like a cake-colored lily pad with a big strawberry flower blooming on top of it.

Final Product

Final product

The team was quite impressed. This is one of my first, more complex from-scratch endeavors up here. I can make a damn good key lime pie from scratch (or other types of pie) but that only takes 20 minutes or so. Anyway, it felt really good when the girls oooh’d and ahhh’d over it. And then everyone took a bite and it was quiet for a second then there were a lot of “mmm, wow, Ruthie!”s.

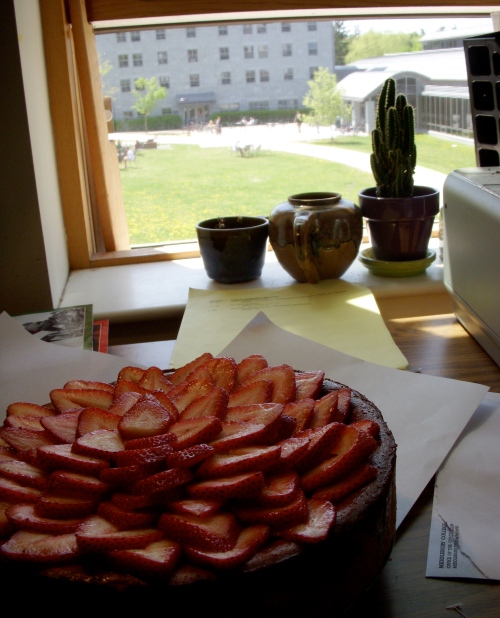
my cake, my pottery, and my cactus

Cheesecake, pottery, cactus

Read Full Post »